Table of Contents
Welcome to the team! In order to make the most of your time at the project please read the below document explaining the Project Management System
Introduction to the Project Management System (PMS)
What is the purpose of the PMS?
- Keeping track of the progress of tasks
- Log hours of work
- Make resources/priority decisions
- Providing a space for team members to bring forward tasks not yet documented
- Document how to do tasks and where to find the tools to carry them out
- Provide a clean picture of what task are outstanding
Where do you fit in?
Whether you are a team member or a project manager you have a lot to bring to the project, including your skills, knowledge, ideas and time. The PMS is a tool that allows you to find areas which are common between your interests and the project objectives.
Team members can:
- Assign tasks to themselves (requires approval from the Project Manager)
- Identify tasks where they can help others carry out tasks that are ongoing
- Identify and create new tasks
- Update task descriptions to aid other team members when completing future tasks
- Changes task status (assigned, in progress, done, feedback)
Ok where do I start? - Registering on the PMS
Register here by completing all the mandatory fields as seen below
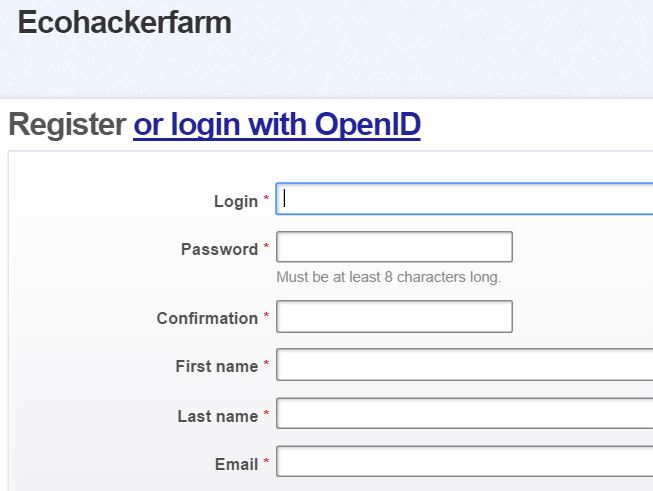
Project managers will be alerted of your registration by email and add you on as a team member either to Kuckucksmühle or Veintidós or both depending on which one you are interested in, we also have Digital Infrastructure and Digital Playground the last two are task that can be carried out online.
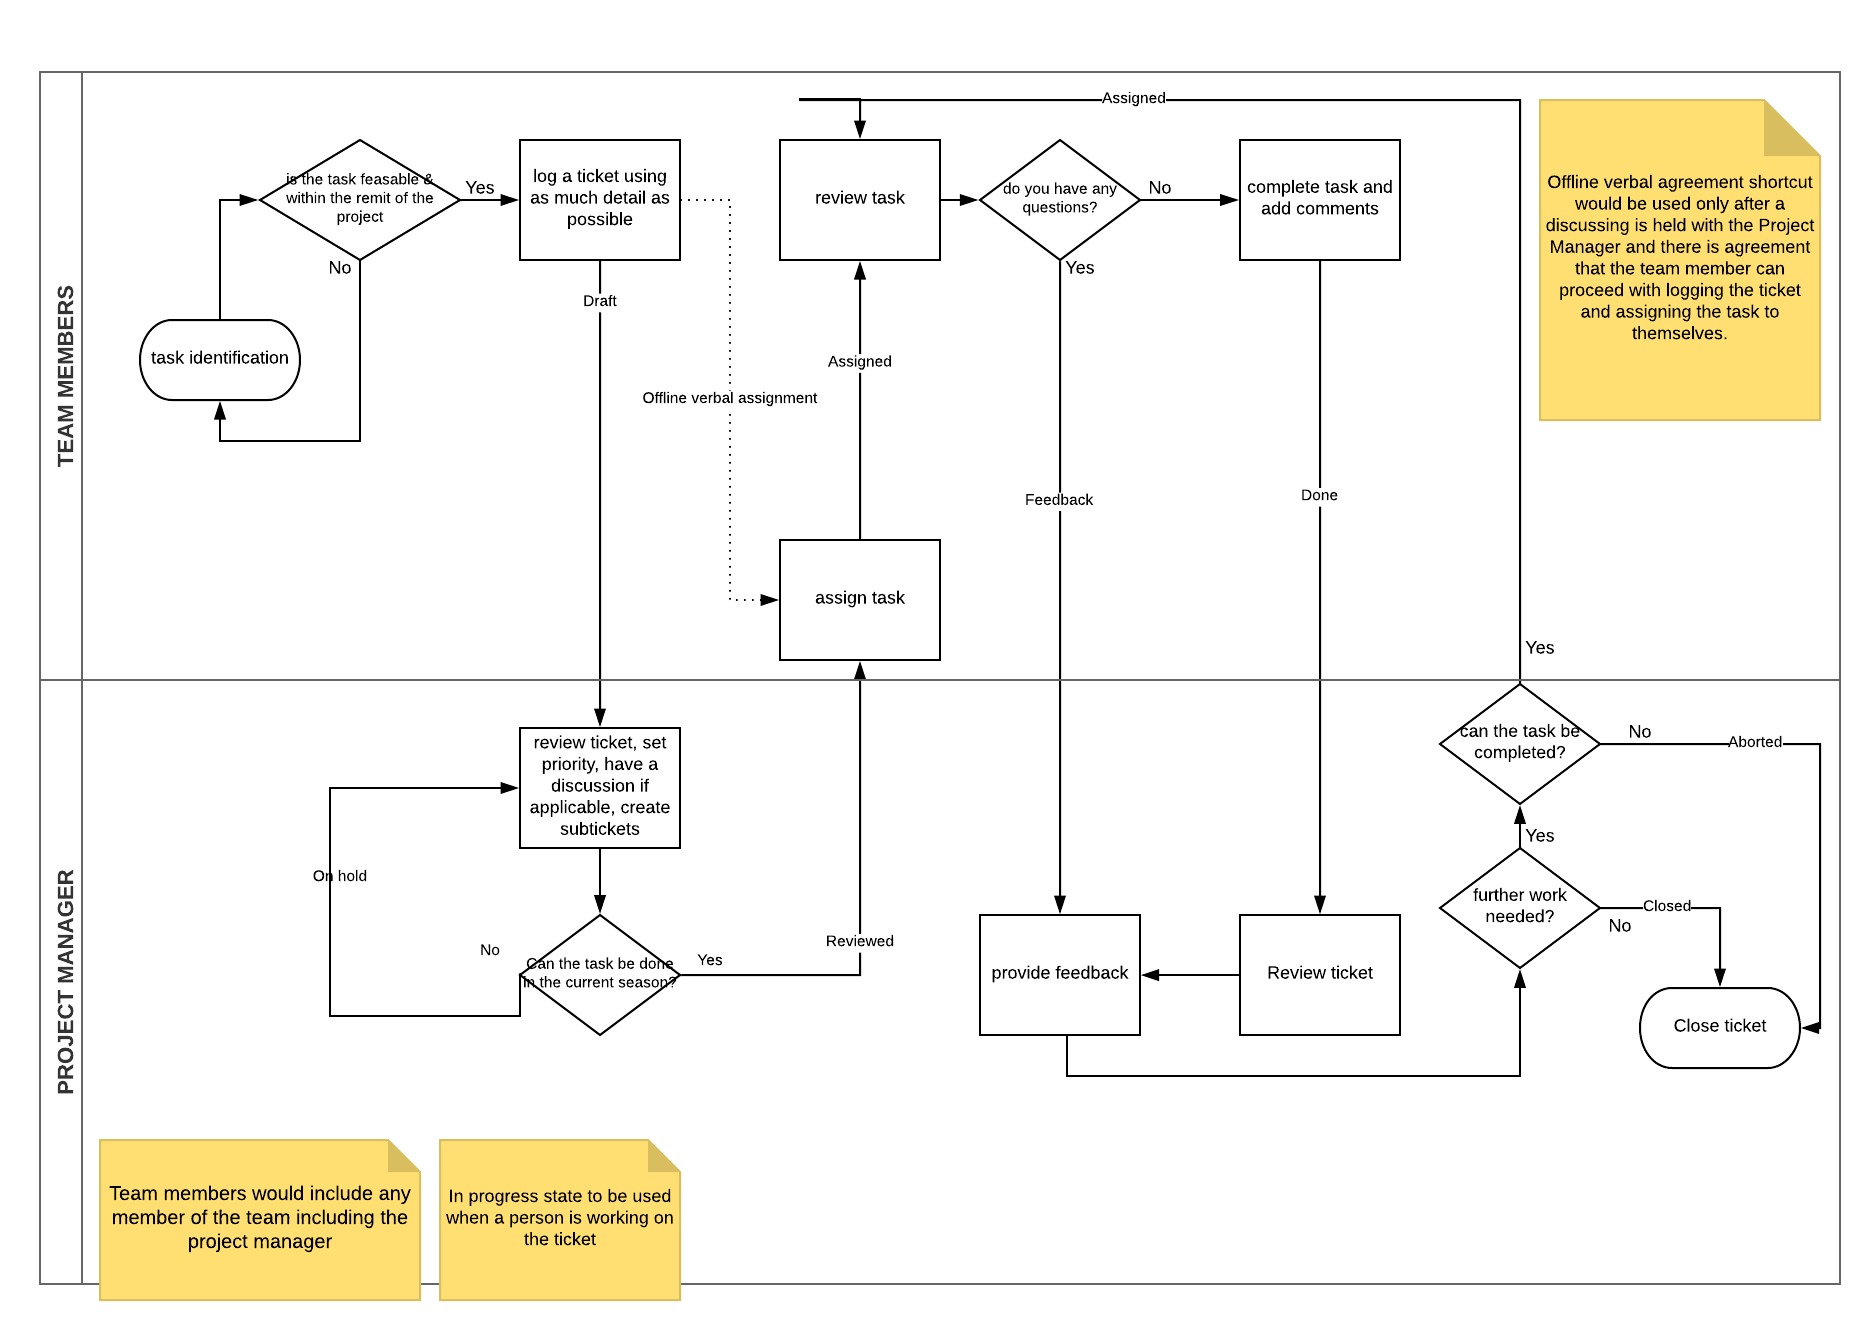
Different task statuses
Draft
The ticket has been created by the Project Manager or Team Member but doesn’t include the full details required as yet.
Reviewed
The ticket has been reviewed by the Project Manager and it is now ready to be assigned to a Team member. Team members can assign these tasks to themselves if this has been approved by the Project Manager (a verbal approval is sufficient)
Assigned
The task has been assigned to a Team member however the individual hasn’t started working on it yet
In Progress
The task has been assigned to a Team member and they are working on it
Done
The team member has completed the task, it will now be reviewed by the Project Manager.
Feedback
The team member has questions about the task that need to be answered by the project manager before a task can be completed.
Questions for the project manager should be included in the notes section.
Revision
The project manager has reviewed a completed task and noticed that something is not quite right. A comment will be included to explain what needs to be done in the notes.
Closed
The project manager has reviewed the completed task and closed the task. Nothing further is required.
Aborted
The project manager has assessed the task and for any number of reasons decided that it cannot/is not practical for it to be carried out.
Different types of tasks
Normal tasks
These include both One-off tasks and Recurring tasks:
One-off tasks are typically tasks that need doing once, on rare occasions and the need to do them for which frequency cannot be predicted
These would include repairs or new constructions, one-off projects for example:
- repairing the chicken coop
- setting up a new greenhouse
- repairing the swing
- getting the oven checked by a professional
- getting the carpenter to check out the beams
Recurring tasks are typically tasks for which there is a set frequency but are not done of a daily basis for example:
- Taking out the bins
- Deep cleaning
- Washing the windows
- Turning the compost
- Brushing the dog
You should log your time against Normal tasks whenever you spend time doing them, see section How to log time against a task.
If you're interested in the workflow diagram see here
Day to Day Tasks
These are tasks that are carried out daily for example:
- Watering the garden
- Filling the dishwasher
- Doing the laundry
- Cleaning the kitchen
- Shared meal preparation
For Day to Day tasks you should only amend the description if you have any more details to add to it if you notice that there are steps in the process that have been missed out. Please refer to the section Amending a task.
You should log your time against Day to Day tasks whenever you spend time doing them, see section How to log time against a task.
If you're interested in the workflow diagram see here.
Finding an existing task
There are various ways to find a specific task:
Use the search facility using a key word

Type into the search box a key word for the task you are looking for. For example if you want to find the Day to Day task for cleaning the kitchen you could use “kitchen” as the keyword for your search and hit the enter button on your keyboard.

This will take you to the search interface, here you can refine your search. In the drop down menu indicated below you can choose whether you want to search an issue (task) in a specific project and its subprojects or if you want to search all projects.
You can choose whether to search all words or search tiles only by clicking in the appropriate tick box. This can be useful for finding specific issues (tasks) such as the one we are using as an example.
The tickboxes enable you to pick whether you are looking for Issues (tasks) and Wiki pages.
You can bring down the additional Options tab by clicking on the little arrow near Options, here you can tick the boxes to search for Open issues only.
Once you are satisfied that you have enough details for your search you can click on the Submit button.
The results will be displayed below the search interface and you can click on the link to open the issue that you were looking for. If you are still unable to find the task but you know that it surely exists you can ask another team member or the project manager for assistance.
Use the search facility using a task number
If you know the task number just type this into the search box hit enter on your keyboard and it will automatically find the task you are looking for.
Finding tasks when you know that they are under a specific project/sub-project
If you have been assigned a task verbally such as for example cleaning the kitchen you can look for the task in the specific sub-project.
To see a list of Projects and Sub-Projects click on Home.
The project/sub-projects you are a team member of are marked with a star next to their name.
Under each Project you will see a list of sub-projects with details as to what each sub-project includes.
In this example let's assume you are a team member for Veintidós, you will be able to see a list of open issues for all of the project by clicking on the Issues link.
To narrow the search it may be easier if you identify which sub-project the issue/task would be under, in this case you can see that there is a sub-project called House & General, this includes general tasks that are house related and other tasks that don't fit in with the other categories.
If you click on the sub-project title you will be able to see a list of open issues by clicking on the Issues link.
In this view you can then sort the issues by clicking on the column titles, or add a filter to aid with your search.
What if the issue/task doesn't yet exist?
If you have looked everywhere and the issue/task does not exist and needs to be created you can create a New Issue, please read How to create new tasks.
Amending a task
Issues (Tasks) can be edited once they are created. To get started, click on the edit link.

You'll be able to edit:
- Project - you can move a task to another sub-project or main project
- Tracker - you can change the task from Normal Task to Day to Day task or vice versa read Different Types of Tasks
- Subject - you can change the subject or add detail to it if needed
- Status - you can change the status read Different Task Statuses
- Assignee - you can assign a task to yourself or others if previously agreed with the project manager or other team member involved
- Tools & Materials
- Motivation
- Description - click on the pencil icon to edit
On this view you can also add:
- Spent time
- Comments
- Notes
How to create new tasks
If you need to create a new task you should already have a good idea as to which sub-project this should be logged under. You can find a list of Projects and Sub-projects by clicking on Home and then Projects where you'll be able to see a list of Sub-projects with a description for each.
Click on the Sub-Project title and then click on New Issue
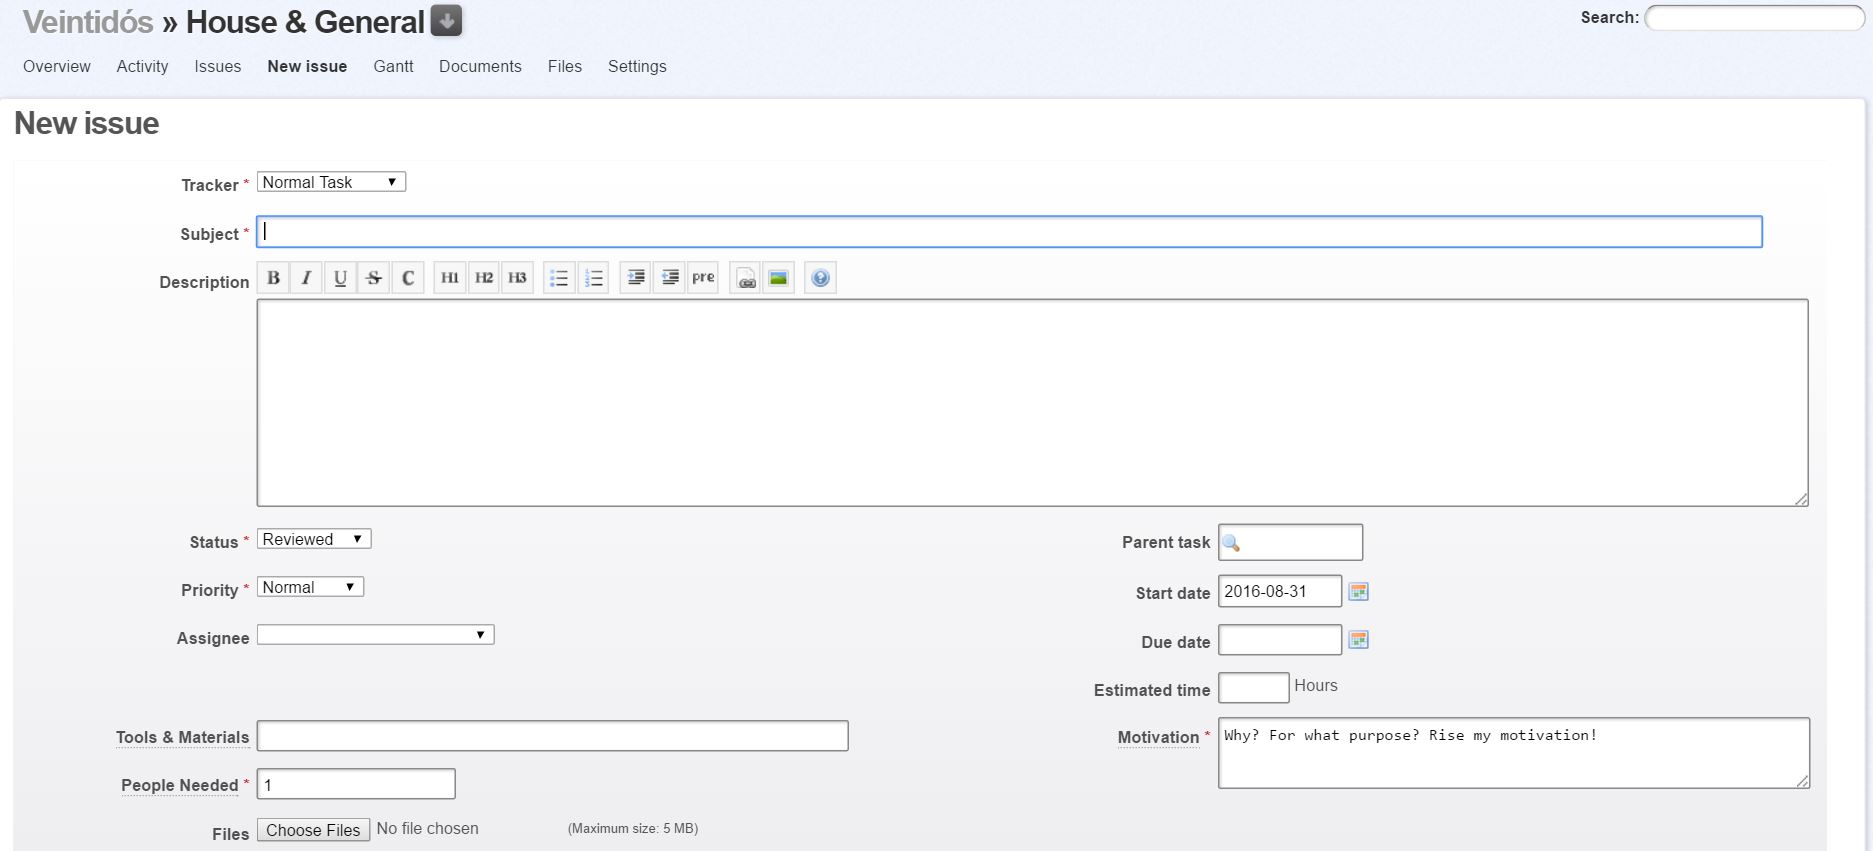
As you can see the mandatory fields are marked with a red star, make sure that the subject is clear and the description include as much detail as possible.
If the task has already been discussed and agreed with the Project Manager you may go ahead and change the status to Assigned and assign the task to yourself or another team member if you've already agreed this with them verbally.
If you haven't yet agreed the task with the Project Manager you should set the status to feedback and Assign the task to the Project Manager
Once this has been reviewed by the Project Manager depending on the outcome the task may either be assigned to you or others or amended with further instructions or aborted if it is not feasible. Refer to the workflow process.
How to log time against a task
After you have found the task you need to log your time against simply open the task and click on the log time link on the top right hand corner as seen below:

This will open a new view where you can add the time spent and also a comment. It is best practice to log your hours on the same day that you do them so that the data is more accurate and you don't have to remember however this view also enables you to log time for tasks on any previous date by simply changing the date field.

As you can see the comment section is not obligatory but could be helpful if later on you need to remember what part of the task you completed if you hadn't managed to finish it in one sitting.
Once you're done you can click Create, this will save your logged time and will take you back to the task view with a confirmation on the top that indicates the update was saved.

You can also click Create and Continue, this will allow you to add logged hours to other tasks as well provided you know the task numbers which may be changed by simply typing in the number and clicking on the little magnifying glass. As you can see in the previous screenshot this will display the name of the task you are logging your time against.
How to check how many hours you have logged

Go to the main project page you are working on as seen in the above example, click on Details or Report on the left marked in red above.
Use the filters to see hours by user:

Click on the Add filter drop down, select User
Select your name from the dropdown list and click on the apply link:

If this function isn't working for you advise the project manager who will be able to help.